Sunday, 7 June 2015

DIY Crochet Bunting!!


Hiya guys!  Happy Sunday!  Hope you’ve all had a good week!
 
I’ve had a busy past few weeks, and totally struggled to do a wee crafty project last week to post to the blog – which I’m totally gutted about L, naturally.  But I decided I’d rather post up something I enjoyed making rather than doing something in a rush just so I had a new post up!  I’m such a perfectionist and it’s rather annoying at times, ha!
 
Anyways…I had a few wee days off this week (yay!), so I had a good sit down and did this week’s project.
 
A couple months ago, when I went into town to do one of my crafty shopping sprees, I decided I’d get a couple crochet tutorial books.  I’m quite a visual learner, I’d rather watch a YouTube video tutorial about new stitches and patterns, but I thought ‘Why not get a book about crocheting instead?’  I did realise though, once I got home and tried one of the designs, that reading patterns is quite tricky!!  I got a wee bit stressed out to be really honest.
 
However, this was only because I was new to reading how to do a pattern.  Like anything you are a beginner at, it just takes time and a lot of patience - just keep at it and you’ll get there!!
 
And…getting back on track…when I was flicking through the pages of the book - which is listed at the bottom of the post, as usual – I came across this pattern that is really neat…bunting!!!  Those super-annoying but equally festive multi-coloured, decorative flags that you see everywhere at celebrations and outdoor events, as well as indoors for parties!
 
So, I made my own crochet bunting!  It’s really quite cool and definitely an alternative to the plastic versions. Plus, it adds a homemade touch if you use it for parties!


What I used:
 
 
·         A variety of bright coloured yarn: white, neon yellow, pink sparkle and blue sparkle.


·         4mm crochet hook


·         The book, bunting tutorial.


I’m not doing a tutorial for this wee crafty project as I’m still a beginner at crochet and wouldn’t be able to explain it properly, so it is just photographs of my finished bunting.


A close up of the yarn strands.
 
 
It didn’t say how to join the little triangle blocks, so just made a chain
then used the same stitch as was used in the main pattern
to attach the triangle to the chain.
 
 
The chain between the triangles.
 
 
The stitch attaching the triangle to the chain.


And here are some photos displaying the bunting in use:


I have to say, I think the bunting is quite funky!  You can use any colour you like as well, which is fab!  I think next time, though, I will make the triangles a bit bigger?  Should be pretty easy(ish) to do ha ha!
 
Anyway guys, thank you SO SO much for reading!  I hope you enjoyed this post J and I will catch you all next time!
 
As always have a fab week and take care!  Xxx


Sources:
 
500 Crochet Blocks by Hannah Elgie & Kath Webber


Monday, 25 May 2015

5-minute DIY project: Decorating flower pots!!


Hiya guys!  Hope you’ve all had a good bank holiday weekend!
 
For this week on the blog, I fancied doing a wee 5-minute DIY!  A super easy little project that can be done hardly anytime at all! 
 
This week’s DIY will be about decorating some wee flower pots that I managed to pick up! 


What I used:
 
·         Three small flower pots (under £5 all together)
·         Gold leafing pen
·         Masking tape and skinny washi tape
·         Art masking fluid
·         Small paint brush


These wee colourful clay flower pots for under a fiver…total bargain!!
 
 
This metallic gold leafing pen is great as the colour goes on quite opaque. 
No need to go over again!


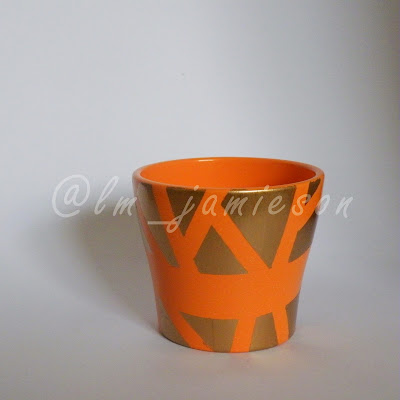
Little flower pot #1: Gold block colour pattern!


Firstly, I taped over the parts of the surface where I didn’t want any colour, using the masking tape.  I then thought I would use the skinny washi tape to break up the big block into little blocks of all different sizes and shapes!  Therefore, creating a geometric look!
 
Ta Dah!


Little flower pot #2: Dotty pattern!


I bought this art masking fluid from a stationary shop a couple days ago and I thought I would try it out.  I know it’s only really meant for paper, but it worked quite well on the surface of the flower pot.
 
It’s kind of like glue to be honest, so if you don’t have this, you might be able to use PVA glue instead!


So, all I did was paint on the design I wanted, let it dry completely - which only took a couple minutes - then I went crazy with the dots!
 
Once the ink was dry, I peeled off the masking fluid to reveal the part of the surface that hadn’t been dotted!  I then just used the pen to neaten up the line of the un-dotted part.
 
Basically, it’s kind of like the cup that I made in my ‘Mother's Day DIY gift ideas!’ post.


Little flower pot #3: Freehand line pattern!
 
 
For the last pot I  ust used the pen to draw lines from the bottom upwards - quick lines that went halfway up, creating a sort of ombré look from green to gold!


This one only took a minute or two to do, so it was by far the easiest one of the three!
 
However, I’m not sure if the gold and green really complement each other?  Ah well, maybe I will block it in so it is all gold and leave the inside the lovely green colour?


Finished little flower pots!!


I loved these before they were beautified and I love them even more now!!
They would definitely look lovely on a desk or dressing/make-up table for storing all your bits ‘n’ bobs!
 
 
Anyway guys, thank you SO SO much for reading!  I hope you enjoyed this post J and I will catch you all next time!
 
Have a fab week and take care! Xxx


Sunday, 17 May 2015

Photo Post: Back to the Philippines Vacation 2008!!


Hiya guys!  Happy Sunday!  Hope you’ve all had a great week!
 

For this week on the blog, I fancied doing another wee ‘hashtag throwback’ photo post!  But, this time would be about going back to the Philippines for a visit in 2008.  As I said in my first post, I’m a hapa - my wee mammy is from the Philippines.  Every 5 or 6 years or so, we go over to visit her side of the family, and while we are there we get to do touristy things (which I love, obviously) and go and visit all these new places, some of which you will see in this post!
 

So, I’ll just get started then…


We began the touristy stuff in Cebu City!


Jeepney.
The most popular of public transportation vehicles in the Philippines!
I love travelling on a jeepney!
 
 
Street art in Cebu. 


Visiting the Basilica Minore del Santo Niño (Sto. Niño church)! 


Billboards on the highway (motorway?).


Visiting Mactan Shrine with the statue of the heroic chief Lapu Lapu who defeated Ferdinand Magellan!


20 metre high bronze statue of Lapu Lapu.
 
 
Painting of the Battle of Mactan.


Tribal Art.


Visiting Fort San Pedro!


Walking around with brollies because the sun was beating down on us
(…and it was roastin’!)


This lovely wee man was singing at the fort.
Such a good singer!

 
Sampaguita!
The national flower of the Philippines!


Visiting Cebu’s architecturally amazing Taoist Temple in the Beverly Hills subdivision of Cebu!


Random Photos!


I love this photo!
Took it while driving past the shop.


Going on the ferry to get to Bohol!


I think it took about an hour to get to the island.

 
Ako (me).


Lunch at McDo’s (obvs!)


Visiting the Chocolate Hills!


214 steps to get to the top! Oft!


Visiting the Hinagdanan Cave!


Getting to go on a floating restaurant/river cruise on the Loboc River!


I love how people are so smiley in the Philippines!

 
The ‘Tinikling’ dance performed by a group, as we passed on the boat.
Tinikling is a traditional Filipino dance using two bamboo poles.  
The poles are used to tap a beat against each other and on the ground,
and the dancers jump between the poles.
I SO want to learn this dance, but I have a feeling I will have quite a few bruises on my wee ankles.
 Ouch.


Hitting the beach!


Not sure what this beach was called?
But it was near the place we stayed overnight at.


Visiting the Baclayon Church in Bohol!


Feel quite lucky to have got the chance to see this old church,
as the earthquake in 2013 caused a lot of damage to a lot of the buildings in Bohol.


Visiting the Sandugo (Blood Compact) monument in Tagbilaran!


Going to visit the Tarsiers!


…and the world’s largest python!


We took the ferry again to get back to Cebu.  Then we travelled from there to Tacloban City!


Wee photo before we left Cebu!


Bye Cebu!  See you next time!


Tacloban!!


The San Juanico Bridge (on the way to Samar, I think?)


Visiting the little piggies at the Piggery!


Visiting the Macarthur Landing!


Some more random photos!
 
 
Tricycles and motorbikes.


Manok (Chicken).


Hitting the Beach…again!


Sun + sand + family + games + swimming + lechon (spit roast pig) + pancit (noodles) = Good times!


Then it was time to leave L


We managed to pack a lot into the month that we were over there, and we all had a grand time seeing the family and visiting new places!


Wee airport photo before leaving the Philippines!


Until next time Philippines!!
 

It’s quite sad to think of all the damage that the typhoon did to Tacloban two years ago!  As I said, these are photos from 2008 and I haven’t been back since then, so I’m not sure what it’s like now?  A lot of things have changed, so the next visit might be a wee teary one L
 

Anyway guys, thank you SO SO much for reading!  I hope you enjoyed this post J and I will catch you all next time!
 

Have a fab week and take care! Xxx


Sources:
 
Mactan Shrine
 

Fort San Pedro
 

Taoist Temple
 

Chocolate Hills
 

Tinikling, Filipino Dance
 

Blood Compact Monument
http://www.bohol.gov.ph/index.php??=boholHistory
 

Macarthur Landing
http://en.wikipedia.org/wiki/MacArthur_Landing_Memorial_National_Park