Showing posts with label Redecoration. Show all posts

Monday, 25 May 2015

5-minute DIY project: Decorating flower pots!!


Hiya guys!  Hope you’ve all had a good bank holiday weekend!
 
For this week on the blog, I fancied doing a wee 5-minute DIY!  A super easy little project that can be done hardly anytime at all! 
 
This week’s DIY will be about decorating some wee flower pots that I managed to pick up! 


What I used:
 
·         Three small flower pots (under £5 all together)
·         Gold leafing pen
·         Masking tape and skinny washi tape
·         Art masking fluid
·         Small paint brush


These wee colourful clay flower pots for under a fiver…total bargain!!
 
 
This metallic gold leafing pen is great as the colour goes on quite opaque. 
No need to go over again!


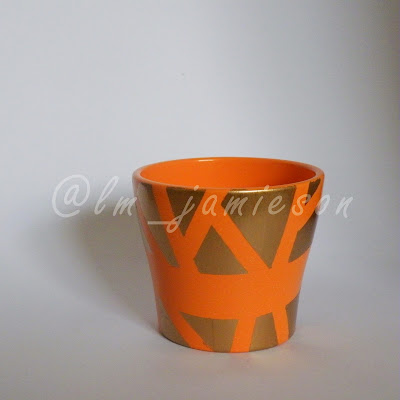
Little flower pot #1: Gold block colour pattern!


Firstly, I taped over the parts of the surface where I didn’t want any colour, using the masking tape.  I then thought I would use the skinny washi tape to break up the big block into little blocks of all different sizes and shapes!  Therefore, creating a geometric look!
 
Ta Dah!


Little flower pot #2: Dotty pattern!


I bought this art masking fluid from a stationary shop a couple days ago and I thought I would try it out.  I know it’s only really meant for paper, but it worked quite well on the surface of the flower pot.
 
It’s kind of like glue to be honest, so if you don’t have this, you might be able to use PVA glue instead!


So, all I did was paint on the design I wanted, let it dry completely - which only took a couple minutes - then I went crazy with the dots!
 
Once the ink was dry, I peeled off the masking fluid to reveal the part of the surface that hadn’t been dotted!  I then just used the pen to neaten up the line of the un-dotted part.
 
Basically, it’s kind of like the cup that I made in my ‘Mother's Day DIY gift ideas!’ post.


Little flower pot #3: Freehand line pattern!
 
 
For the last pot I  ust used the pen to draw lines from the bottom upwards - quick lines that went halfway up, creating a sort of ombré look from green to gold!


This one only took a minute or two to do, so it was by far the easiest one of the three!
 
However, I’m not sure if the gold and green really complement each other?  Ah well, maybe I will block it in so it is all gold and leave the inside the lovely green colour?


Finished little flower pots!!


I loved these before they were beautified and I love them even more now!!
They would definitely look lovely on a desk or dressing/make-up table for storing all your bits ‘n’ bobs!
 
 
Anyway guys, thank you SO SO much for reading!  I hope you enjoyed this post J and I will catch you all next time!
 
Have a fab week and take care! Xxx


Sunday, 16 November 2014

Bathroom Redecoration Project: Part One!!

 
Hiya guys!  How are you all doing?  Hope you've all had a great week!
 
So, if you can remember, a few weeks ago I did a post giving you tips to help decorate a room.  Well, this week I thought I would sort of expand on that and actually focus on a room in my house!
 
Well, not that long ago my dad decided that the bathroom had to be redone as it had been a while since it has been done up - I can't actually remember when!  Anyway, to be honest we (my family and I) aren't ones to redecorate every year or two.  We prefer to have something done that is going to last a while until it definitely needs to be done again!
 
I have to say before I properly get into this post that this will just be the first stage of the bathroom redecoration project!  With Christmas coming up, and with work commitments and everything, this project will take a wee while to complete, but hopefully it will be all finished in the first half of 2015!
 
For the moment, this post will show you what I have done for the first part of the project - the research stage.
 
Well, so far what has happened is...the wallpaper has been taken off the walls revealing painted plaster.


As you can see, there are quite a few cracks and holes in the wall from removing the paper.  What was under the paper though is quite a nice green colour...and quite a few scribbles that my sister and I did when we were younger!
 
This is all that has been done for the moment.  My dad did ask about decorating the room - with how to fix the walls before painting etc.  This was a while back though and I didn't really know what to do if I'm being really honest.  I did a bit of research about it and I thought this would be a good project to do since starting up my blog!  This way I can post updates on how it is coming along!
 
And so, to start this project, I spoke to the family to see what we all wanted the bathroom to look like, to get an idea about colour schemes etc.
 
I then made a colour/mood board!
 
If you don't know what a mood board is you can have a look at my earlier post 'Stuck on how you want to decorate a room? Here's a wee design tip that can help you get your ideas together!'
 
A mood board will help us see what kind of colours, textures we could use in the room.


Basically, to start with I picked images from magazines and from Pinterest and stuck them down on to the card.
 
You don't have to use magazines or websites that are specifically for interior decoration.  You can get inspiration from anywhere and anything - from the design of a perfume bottle to the colours from a video game cover and the look of certain fabric - anything!
 
This is the mood board I created with the project brief that the family came up with.


So far they think this is good, and we are finally getting on our way to starting this project.  Of course I will keep you all informed on how it is all going.  I'll most likely be tweeting about the progress of the project - you know, the things that are too small for a blog post.  Therefore if you haven't followed me yet...the link to my social media pages are on the right of the page.  So all you lovely people, please add, like, follow me...it would be much appreciated! :)
 
Without taking up any more of your time this with this post - I realise it has been more like an essay - I will say cheerio for now!
 
Oh, before I forget, if any of you have any tips for filling cracks and holes in bathroom walls and what to use etc. please leave me a wee comment, either in the comments below or on Facebook or Twitter!  That would actually be fab!!  It would be good to hear from people who have done this before.
 
Okay, okay...that's me!  Have a good week and I'll speak to you all next Sunday!  Until then...see ya!